PyLadies Galentine
I took a class on Coursera from Rice University called An Introduction to Interactive Programming in Python, and a couple of the games we learned to write were Pong and Memory (the card guessing game). I was looking for a way to use what I learned to make a fun project, so I decided to try and make a digital Galentine using Python.
As I talked about in the post on PyLadies: Cooking Code for Breakfast, I got to hang out with the PyLadies on Galentine’s Day so I got to show off my Galentine there. While the holiday is actually February 13th, Saturday fell on the 14th (Valentine’s Day). Which was lovely, because at the co-op they had put out white tablecloths, candles, and roses on all the tables.
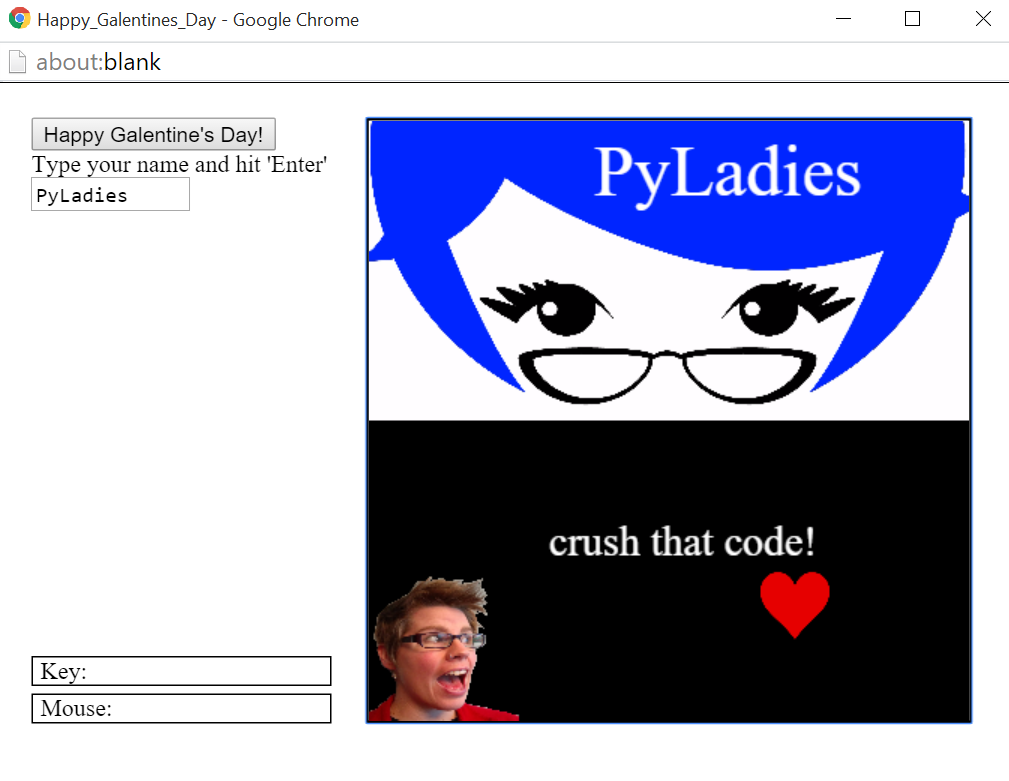
I designed my project to use the skills we learned writing these two games, and I had access to the examples provided by the teachers, my source code that I used for the games, and code that I reviewed and graded for three peers (who usually did better than I did). Starting with that existing code, I created an interactive e-card that incorporated images of me and PyLady hair that changed color, a bouncing heart, some interactivity that allowed a user to enter their name and change the message that appeared in the card. I used the browser-based Python interpreter used in the class, CodeSkulptor, to run the code.
##CodeSkulptor The class that I took used CodeSkulptor for all the projects, which was great because it runs Python code in the browser and you don’t have to download or install anything to be up and running immediately. CodeSkulptor uses a module called SimpleGUI for the interactive game and drawing programs, so that’s what we learned in this class (looking up the documentation right now I discovered there is also a mapping module and a plotting module).
In each of the lessons we would learn a bit about the functionality of CodeSkulptor for building interactive games: creating handlers, drawing on a canvas, packages available to import and use, global and local variables. The lessons instructed us on how to use syntax and do the tasks required for assignments and projects, and also how to read the documentation in order to figure out something not explicitly taught. Additional exercises were available each week that would help students work their way up to the mini projects, and the solutions were provided so you could try and then check your work.
I really enjoyed learning about CodeSkulptor; it allowed us n00bs to do a lot of neat things without knowing much about how it worked at first. It was neat to understand it more as we learned in the class as well; when we got to the lesson introducing classes, for example, the CodeSkulptor commands began to make more sense!
View and run the code for the Galentine in CodeSkultptor here
To play, hit the play button in the upper left corner of the screen, and then you can click the button that says “Happy Galentine’s Day to change the message. You can also type your name in the text box and hit “Enter” to personalize the Galentine.
##Brainstorm I started by drawing out what I wanted the Galentine to look like and added notes about the functionality. I drew the canvas (pencil and paper, really high-tech) with the images and text I wanted, and drew arrows indicating where I would put a button to change the message and a box for the user to enter their name. Since I wanted things to move and change, I also thought about what actions could trigger the movement/changes. While deciding on a design, I also started thinking about how I could make these things happen- I didn’t want to add a feature I had no idea how to make, but I didn’t need to know exactly how I would do it, either.
##Start With Existing Code While creating Memory, one of the lessons was using images on the canvas. This lesson involved learning how to use the coordinate system in CodeSkulptor where Pong used the draw functions to generate the images. I decided to use an image of one of the PyLady logos and an image of me (since it was a Galentine from me to other PyLadies).
I decided to add movement and changes that were similar to those in Pong, but instead of a bouncing ball I would have a bouncing heart- which involved grabbing an image of a heart instead of using the draw functions to draw a circle. Here we also learned to create gutters so the ball didn’t go off screen, to set the direction and velocity of the ball, and to have the ball react by bouncing off of edges.
##Break The Project Up I determined that there were four main chunks of work that I wanted to do, and while I probably had to get the images drawn first, the order of the other items didn’t really matter:
- Drawing
- Changing Hair Color
- Bouncing Heart
- Interactivity: Name and Changing the Message
###Drawing I wanted to have two distinct areas of the canvas: one for the image of the PyLady, and one where the heart would bounce around. This required figuring out how to draw a canvas where the top half was an image and the bottom half was the region in which the heart could go.
To draw the images (including all possible PyLadies, an image of me, the heart, and the name and message texts) requires creating a handler function, loading the images, and then using the draw function of SimpleGUI (here I have removed the code for choosing the hair color as I talk about that in the next section):
# Handler to draw on canvas
def draw_handler(canvas):
    global num2
    global image
    global heart_pos
    global vel
    global heart_width

    image_blue = simplegui.load_image('https://dl.dropbox.com/s/vh5bpccsn1qlde0/pyladies_blue.jpg?dl=0')
    image_green = simplegui.load_image('https://dl.dropbox.com/s/34ayk7pd0zti5tx/pyladies_green.jpg?dl=0')
    image_red = simplegui.load_image('https://dl.dropbox.com/s/zcfm0it0meeth2m/pyladies_red.jpg?dl=0')
    image_purple = simplegui.load_image('https://dl.dropbox.com/s/io6k7f5idlmpmfb/pyladies_purple.jpg?dl=0')
    image_pink = simplegui.load_image('https://dl.dropbox.com/s/v1hob4akrvd454j/pyladies_pink.jpg?dl=0')
    image_orange = simplegui.load_image('https://dl.dropbox.com/s/rr8r3a5osd675n5/pyladies_orange.jpg?dl=0')
    image_rox = simplegui.load_image('https://dl.dropbox.com/s/nikdz4q581b3wlv/roxface.png?dl=0')
    heart_image = simplegui.load_image('https://dl.dropbox.com/s/qf02x8l70e0a742/heart.png?dl=0')

    # these are the pylady image files, one for each color, plus rox and heart
    # canvas.draw_image(image, center_source, width_height_source, center_dest, width_height_dest)
    # image is image name
    # center_source is (x, y) center of source image
    # width_height_source is (width, height) of source image
    # center_dest is (x, y) where you want to put it on canvas = ball_pos
    # width_height_destination is the (width, height) you want for the image on the canvas

    canvas.draw_image(image, (3487/2, 1881/2),(3487, 1881), (200, 100), (400, 200))
    # draw pylady image

    canvas.draw_image(image_rox, (1080/2, 1920 / 2), (1080, 1920), (50, 350), (100, 150))
    #(source image center), (source image size), (upper left corner goes here on canvas), (width, height)
    # those first two things have to do with the original image size

    canvas.draw_text(name, [150, 50], 48, "White")
    # draw user's name

    canvas.draw_text(message, [120, 290], 28, "White")
    # draw supportive message
To draw the name and message text:
canvas.draw_text(name, [150, 50], 48, "White")
    # draw user's name

    canvas.draw_text(message, [120, 290], 28, "White")
    # draw supportive message
The messages are assigned here and then made into a list. This way, an element can be selected from the list and a random message appears.
m0 = "crush that code!"
m1 = "code that thang!"
m2 = "you're great at coding!"
msg_lst = (m0, m1, m2)
# these are the possible messages that will appear below the pylady image and a list of all of them
###Changing Hair Color The PyLady logo is a simple image of hair that is an iconic PyLady-red and some eyes with glasses. This made it easy to change the hair color; I used Paint.net to simply make a set of images that were exactly the same but with different colored hair:
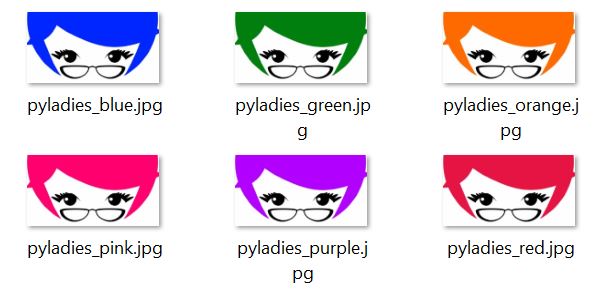
To change the color, the program would just call a random image whenever a thing would happen. The thing, I decided, should be when the heart bounced off one of the sides of the border. I gave the images names, created a list of the images, and when the thing happens (heat reaches border), the variable num2 is randomly assigned an integer between 0 and 5 using num2 = random.randrange(0, 5), and then that element in the list of images is drawn.
image_lst = (image_red, image_green, image_blue, image_purple, image_pink, image_orange)
    # this is a list of each color image from which to select a random one

    image = image_lst[num2]
    # the default is to draw the red image
###Bouncing Heart The bouncing heart was pretty much the same as the bouncing ball we created for pong, except I replaced the circle-drawing function with a heart-image-grabbing function. I used the same physics from Pong where if the center of the heart was a distance equal to the width of the heart away from one of the borders, then the heart’s velocity would simply switch to the negative of what is was initiatlly- making it appear to bounce.
To make the heart and have it move around, I had to:
-
Set the initial position of the heart to appear on the canvas, which I in the beginning of the program with the global variable
heart_pos = [200, 300]. -
Draw the heart on the canvas, shown at the bottom of the code below.
-
Set rules for when the heart position was near the borders, and make the heart “bounce” by negating the velocity
 # heart code
    # update heart position
    heart_pos[0] += vel[0]
    heart_pos[1] += vel[1]

    # collide and reflect off of left hand side of canvas
    if heart_pos[0] <= heart_width:
        num2 = random.randrange(0, 5) # changes pylady color on collision
        vel[0] = -vel[0]

    # collide and reflect off of right hand side of canvas
    if heart_pos[0] >= (400 - heart_width):
        num2 = random.randrange(0, 5)
        vel[0] = -vel[0]

    # collide and reflect off of top of canvas
    if heart_pos[1] <= (225 + heart_width):
        num2 = random.randrange(0, 5)
        vel[1] = -vel[1]

    # collide and reflect off of bottom of canvas
    if heart_pos[1] >= 400 - (heart_width):
        num2 = random.randrange(0, 5)
        vel[1] = -vel[1]

    #draw heart
    canvas.draw_image(heart_image, (300 / 2, 279 / 2), (300, 279), heart_pos, (50, 50))
###Interactivity: Name and Changing the Message We learned to ask for the user to input information or make a choice early on in the class because our first game was Paper, Rock, Scissors, Lizard, Spock, and we also learned how to make buttons for the user to push. These both require handler functions to be created. For the name, I had a text input that would write the user’s text to the PyLady hair when they hit enter.
# Handler to input name
def input_name(text_input):
    global name
    name = text_input
    # input name function gets input from user, sets name var to that input.
    # since name is global, correct inputted name gets drawn by the event handler
I set it up so that when the button is pushed, a random integer that is 0, 1, or 2 will be assigned to the variable num1 and the message associated with that integer will display.
# Handler for mouse click
def click():
    global message
    global num1
    global num2

    num1 = random.randrange(0, 3)
    message = msg_lst[num1]
    # right now, clicking the button changes the message from m[0] to a random m
    # and sets num2 to a new random element from image_lst to change hair color
A note on laziness: Sometimes the message and hair color don’t change when the action initiates a random assignment to num1 or num2, because I didn’t tell it that if the new random integer is the same as the previous random integer to choose another one. I probably should fix that.
To run the program, there is some work I still needed to do calling the handlers to do their jobs. This code creates the frame, the button, the input text box, draws the images, and then starts the frame:
frame = simplegui.create_frame('Happy_Galentines_Day', 400, 400)
frame.add_button("Happy Galentine's Day!", click)
frame.add_input("Type your name and hit 'Enter'", input_name, 100)
frame.set_draw_handler(draw_handler)
frame.start()
I think my Galentine turned out pretty cool, and I definitely learned a lot trying to make a thing that wasn’t an assignment in the class. There was a lot to figure out and trying things before I could get them to work. At one point, I tried a timer to change the hair color and it changed so fast you could barely see it. It was horrible to look at. Thankfully, another feature of CodeSkulptor is if you find yourself in some sort of infinite loop, it ends the program. I love this feature.